Kubernetes HPA 基于 Prometheus 自定义指标的可控弹性伸缩.
整体架构
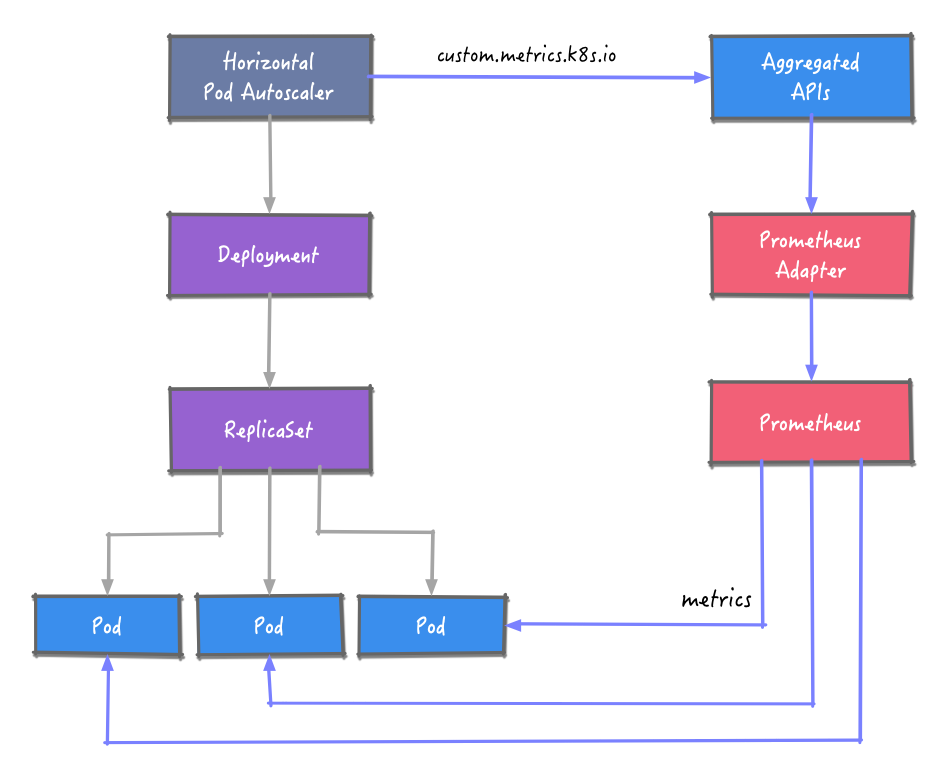
HPA 要获取 Prometheus 的指标数据,这里引入 Prometheus Adapter 组件。Prometheus Adapter 实现了 resource metrics、custom metrics 和 external metrics APIs API,支持 autoscaling/v2 的 HPA。
获取到指标数据后,根据预定义的规则对工作负载的实例数进行调整。
Prometheus Adapter 官方 github:
这里
Prometheus Adapter
环境场景
我们使用 1.16 版本的 Kubernetes 环境。本次分自建 Kubernetes 和,阿里云 ACK 的场景介绍。
自建 Kubernetes
自建 Kubernetes 和 阿里云 ACK 还是有些许差别的,如果不使用阿里云的 external 类型指标,其实都是一样的。
安装 Prometheus
使用 Helm 安装 Prometheus,先添加 Prometheus 的 chart 仓库:
1
helm repo add prometheus-community https://prometheus-community.github.io/helm-charts
这里的测试只需要用到 prometheus-server,安装时禁用其他组件。同时为了演示效果的实效性,将指标的拉取间隔设置为 10s。
1
2
3
# install prometheus with some components disabled
# set scrape interval to 10s
helm install prometheus prometheus-community/prometheus -n default --set alertmanager.enabled= false,pushgateway.enabled= false,nodeExporter.enabled= false,kubeStateMetrics.enabled= false,server.global.scrape_interval= 10s
<可选> 通过端口转发,可以在浏览器中访问 web 页面。
1
2
# port forward
kubectl port-forward svc/prometheus-server 9090:80 -n prometheus
安装 Prometheus Adapter
1
helm install prometheus-adapter prometheus-community/prometheus-adapter -n default -f kubernetes/values-adapter.yaml
待 promethues-adapter pod 成功运行后,可以执行 custom.metrics.k8s.io 请求:
1
2
3
4
5
6
7
8
kubectl get --raw "/apis/custom.metrics.k8s.io/v1beta1" | jq .
{
"kind" : "APIResourceList" ,
"apiVersion" : "v1" ,
"groupVersion" : "custom.metrics.k8s.io/v1beta1" ,
"resources" : []
}
发现 resources 为空,参考 github 上的 issue Resources list is empty at /apis/custom.metrics.k8s.io/v1beta1/ ,heml 参数 --prometheus-url 的值改为当前集群内 Prometheus 的 service 地址即可, 如:–prometheus-url=http://prometheus-k8s.monitoring.svc:9090/ ,重新部署后解决。
部署应用
flask 制造一个 demo 访问 /metrics 模拟返回 http_requests_total 指标
 1
 2
 3
 4
 5
 6
 7
 8
 9
10
11
12
13
14
15
16
17
18
19
20
21
22
23
24
25
26
27
28
29
30
31
32
33
34
35
36
37
38
39
40
41
42
43
44
45
46
47
48
49
50
51
52
53
54
55
56
57
58
59
60
61
import prometheus_client
from prometheus_client import Counter , Gauge
from prometheus_client import Summary , CollectorRegistry
from flask import Response , Flask
import time
import random
import os
app = Flask ( __name__ )
# 定义一个注册器,注册器可以把指标都收集起来,然后最后返回注册器数据
REGISTRY = CollectorRegistry ( auto_describe = False )
# 定义一个Counter类型的变量,这个变量不是指标名称,这种Counter类型只增加
# 不减少,程序重启的时候会被重新设置为0,构造函数第一个参数是定义 指标名称,
# 第二个是定义HELP中显示的内容,都属于文本
# 第三个参数是标签列表,也就是给这个指标加labels,这个也可以不设置
http_requests_total = Counter ( "http_requests" , "Total request cout of the host" , [ 'method' , 'endpoint' ], registry = REGISTRY )
# Summary类型,它可以统计2个时间
# request_processing_seconds_count 该函数被调用的数量
# request_processing_seconds_sum 该函数执行所花的时长
request_time = Summary ( 'request_processing_seconds' , 'Time spent processing request' , registry = REGISTRY )
@app.route ( "/metrics" )
def requests_count ():
"""
当访问/metrics这个URL的时候就执行这个方法,并返回相关信息。
:return:
"""
return Response ( prometheus_client . generate_latest ( REGISTRY ),
mimetype = "text/plain" )
# 这个是健康检查用的
@app.route ( '/healthy' )
def healthy ():
return "healthy"
@app.route ( '/' )
@request_time.time () # 这个必须要放在app.route的下面
def hello_world ():
# .inc()表示增加,默认是加1,你可以设置为加1.5,比如.inc(1.5)
# http_requests_total.inc()
# 下面这种写法就是为这个指标加上标签,但是这里的method和endpoint
# 都在Counter初始化的时候放进去的。
# 你想统计那个ULR的访问量就把这个放在哪里
http_requests_total . labels ( method = "get" , endpoint = "/" ) . inc ()
# 这里设置0-1之间随机数用于模拟页面响应时长
time . sleep ( random . random ())
html = "Hello World!" \
"App Version: {version} "
# 这里我会读取一个叫做VERSION的环境变量,
# 这个变量会随Dockerfile设置到镜像中
return html . format ( version = os . getenv ( "VERSION" , "888" ))
if __name__ == '__main__' :
app . run ( host = "0.0.0.0" , port = "5555" )
部署应用
部署应用过程略,部署完上面的应用,创建 ServiceMonitor 来抓取指标到 Prometheus
 1
 2
 3
 4
 5
 6
 7
 8
 9
10
11
12
13
14
15
16
17
apiVersion : monitoring.coreos.com/v1
kind : ServiceMonitor
metadata :
annotations :
generation : 1
name : demo
namespace : default
spec :
endpoints :
- interval : 30s
path : /metrics
port : http-8080
namespaceSelector :
any : true
selector :
matchLabels :
name : demo
配置 adapter-config, 详细的 Adapter 配置可以参考 这里
 1
 2
 3
 4
 5
 6
 7
 8
 9
10
11
12
13
14
15
16
17
apiVersion : v1
kind : ConfigMap
metadata :
name : adapter-config
namespace : kube-system
data :
config.yaml : |
rules:
- seriesQuery: 'http_requests_total{namespace!="",pod_name!=""}'
resources:
overrides:
namespace: {resource: "namespace"}
pod_name: {resource: "pod"}
name:
matches: "^(.*)_total"
as: "${1}_per_second"
metricsQuery: 'sum(rate(<<.Series>>{<<.LabelMatchers>>}[2m])) by (<<.GroupBy>>)'
这里的 http_requests_total 就是 QPS(每秒请求数) ,指标数据,用下面的命令请求 custom metrics api 获取数据:
 1
 2
 3
 4
 5
 6
 7
 8
 9
10
11
12
13
14
15
16
17
18
19
20
21
22
23
24
25
26
27
28
29
30
31
32
33
34
35
kubectl get --raw /apis/custom.metrics.k8s.io/v1beta1/namespaces/default/pods/*/http_requests_per_second| jq .
{
"kind" :"MetricValueList" ,
"apiVersion" :"custom.metrics.k8s.io/v1beta1" ,
"metadata" :{
"selfLink" :"/apis/custom.metrics.k8s.io/v1beta1/namespaces/default/pods/%2A/http_requests_per_second"
} ,
"items" :[
{
"describedObject" :{
"kind" :"Pod" ,
"namespace" :"default" ,
"name" :"demo-test-7c86bf5d87-2hfkt" ,
"apiVersion" :"/v1"
} ,
"metricName" :"http_requests_per_second" ,
"timestamp" :"2021-08-03T11:55:58Z" ,
"value" :"944m" ,
"selector" :null
} ,
{
"describedObject" :{
"kind" :"Pod" ,
"namespace" :"default" ,
"name" :"demo-test-7c86bf5d87-9p2bx" ,
"apiVersion" :"/v1"
} ,
"metricName" :"http_requests_per_second" ,
"timestamp" :"2021-08-03T11:55:58Z" ,
"value" :"944m" ,
"selector" :null
}
]
}
注意:这里的 value: 100m ,值的后缀“m” 标识 milli-requests per seconds,所以这里的 100m 的意思是 0.1/s 每秒 0.1 个请求。
创建 hpa
 1
 2
 3
 4
 5
 6
 7
 8
 9
10
11
12
13
14
15
16
17
18
19
20
21
apiVersion : autoscaling/v2beta2
kind : HorizontalPodAutoscaler
metadata :
name : demo
spec :
scaleTargetRef :
apiVersion : apps/v1
kind : Deployment
name : demo
minReplicas : 1
maxReplicas : 10
metrics :
- type : Pods
pods :
metric :
name : http_requests_per_total
target :
type : AverageValue
averageValue : 100m
# 1000m 为 每秒1请求,ack 有优化过,1000m 在控制台显示为1
# https://mp.weixin.qq.com/s/LSJI9DK2Tzz8PJ1lJAI6gw
至此,我们基于自建 Prometheus 的自定义指标来完成 HPA 的教程到此结束,接下来,我们再看看如何使用阿里云 ACK 的arms-prometheus 使用 External 度量指标类型 来做自定义指标 HPA。
