目录

Client-go简单教程(四)-ClientSet 实战

利用 Clientset 来实现一个给集群节点自动打污点的需求.

需求背景

IDC 机房 kubernetes 集群每个 node 节点上的 pod 分布不均匀,经常给 node 节点维护带来不必要的麻烦,因此我们使用 client-go 编写一段小程序来调用 kubernetes api 来自动干预 node 节点的调度,减少人力维护的成本。

需求简述

  1. pod 数量阈值可以通过 configmap 配置,脚本跑在 kubernetes 集群内部。

  2. 获取节点信息,判断节点 pod 数量,逻辑如下:

/client-go%E7%AE%80%E5%8D%95%E6%95%99%E7%A8%8B%E5%9B%9B-clientset-%E5%AE%9E%E6%88%98/clientset-action-design.png
程序逻辑
  1. 为方便运维人员调试节点,人为打 cordon 污点的节点不受脚本影响,可以给节点打上 keydonot_cordon ,value任意值 的标签,这样即使节点 pod 数量到达阈值也不会发生 cordon

  2. 因无需实时监听 node 节点状态,程序以 cronjob 的方式运行(后续需求有变更,需要实时的话可以使用 informer 机制来实现)。

需求实现

1. 项目目录结构

  • conf 存放配置信息,用于从 configmap 序列化 yaml 格式的配置文件到程序内部。

  • pkg 下存放各种包(个人习惯,有些人喜欢把utils单独放外面),clientset 存放 ClientSet 实例的初始化代码,utils 存放各种小工具。

  • service 下是存储主程序的实现逻辑代码的。

1
2
3
4
5
6
auto-cordon     
├─conf
├─pkg
│  ├─clientset
│  └─utils
└─service

2. 初始化 ClientSet

pkg/clientset 目录下新建 clientset.go , 注释已经解释得很清楚了,看代码就可以了,这里不做其他赘述:

 1
 2
 3
 4
 5
 6
 7
 8
 9
10
11
12
13
14
15
16
17
18
19
20
21
22
23
24
25
26
27
28
29
30
31
32
33
34
35
36
37
38
39
40
41
42
43
44
45
package clientset

import (
	"flag"
	"path/filepath"
	
	"k8s.io/client-go/kubernetes"
	"k8s.io/client-go/tools/clientcmd"
	"k8s.io/client-go/util/homedir"
)

var (
	kubeconfig *string
	clientset *kubernetes.Clientset
)

// 加载配置文件,初始化 clientset
func InitKubeConfig() {
	if home := homedir.HomeDir(); home != "" {
		// 优先从home目录下寻找 config 文件
		kubeconfig = flag.String("kubeconfig", filepath.Join(home, ".kube", "config"), "(optional) absolute path to the kubeconfig file")
	} else {
		kubeconfig = flag.String("kubeconfig", "", "absolute path to the kubeconfig file")
	}
	flag.Parse()

	// 首先使用 inCluster 模式(需要去配置对应的 RBAC 权限,默认的 sa 是 default-> 是没有获取 nodes 的 List 权限)
	if config, err = rest.InClusterConfig(); err != nil {
		// 使用 KubeConfig 文件创建集群配置 Config 对象
		if config, err = clientcmd.BuildConfigFromFlags("", *kubeconfig); err != nil {
			panic(err.Error())
		}
	}
	
	// 创建 clientset 实例
	clientset, err = kubernetes.NewForConfig(config)
	if err != nil {
		panic(err.Error())
	}
}

// 导出私有变量 clientset
func GetClientSet() *kubernetes.Clientset {
	return clientset
}
信息
初始化 clientset 实例的时候,首先使用 inCluster 模式(需要去配置对应的 RBAC 权限,默认的 sa 是 default-> 是没有获取 nodes 的 List 权限)

3. utils 小工具

pkg/utils 目录下新建 utils.go , 里面存放的函数主要用来处理 pod 数量、node 节点状态和标签解析的:

 1
 2
 3
 4
 5
 6
 7
 8
 9
10
11
12
13
14
15
16
17
18
19
20
21
22
23
24
25
26
27
28
29
30
31
32
33
34
35
36
37
38
39
40
41
42
43
44
45
46
47
48
49
50
51
52
53
54
55
56
57
58
package utils

import (
	"encoding/json"
	"fmt"

	v1 "k8s.io/api/core/v1"
)

// 解析pod数量,pod-requests 结构体
type Data struct {
	Cpu    string `json:"cpu"`
	Memory string `json:"memory"`
	Pods   string `json:"pods"`
}

// 解析pod数量
func PharsePods(str string) (*Data, error) {
	var data *Data
	if err := json.Unmarshal([]byte(str), &data); err == nil {
		return data, nil
	} else {
		fmt.Println(err)
		return nil, err
	}
}

// 解析node节点就绪状态
func PharseNodeStatus(conditions []v1.NodeCondition) bool {
	var status bool
	for _, item := range conditions {
		if item.Type == "Ready" {
			if item.Status != "True" {
				status = false
				return status
			}
			status = true
		}
	}
	return status
}

// 解析标签
func PharseLables(labels map[string]string) (bool, bool) {
	var (
		auto_cordon  bool
		donot_cordon bool
	)
	for k, _ := range labels {
		switch k {
		case "auto_cordon":
			auto_cordon = true
		case "donot_cordon":
			donot_cordon = true
		}
	}
	return auto_cordon, donot_cordon
}

4. 配置主程序

在 service 目录下新建 auto_cordon_service.go

  1
  2
  3
  4
  5
  6
  7
  8
  9
 10
 11
 12
 13
 14
 15
 16
 17
 18
 19
 20
 21
 22
 23
 24
 25
 26
 27
 28
 29
 30
 31
 32
 33
 34
 35
 36
 37
 38
 39
 40
 41
 42
 43
 44
 45
 46
 47
 48
 49
 50
 51
 52
 53
 54
 55
 56
 57
 58
 59
 60
 61
 62
 63
 64
 65
 66
 67
 68
 69
 70
 71
 72
 73
 74
 75
 76
 77
 78
 79
 80
 81
 82
 83
 84
 85
 86
 87
 88
 89
 90
 91
 92
 93
 94
 95
 96
 97
 98
 99
100
101
102
103
104
105
106
107
108
109
110
111
112
113
114
115
116
117
118
119
120
121
122
123
124
125
126
127
128
129
130
package service

import (
	"context"
	"encoding/json"
	"log"
	// "strconv"

	cf "auto-cordon/conf"
	"auto-cordon/pkg/utils"

	metav1 "k8s.io/apimachinery/pkg/apis/meta/v1"
	"k8s.io/apimachinery/pkg/types"
	"k8s.io/client-go/kubernetes"
)

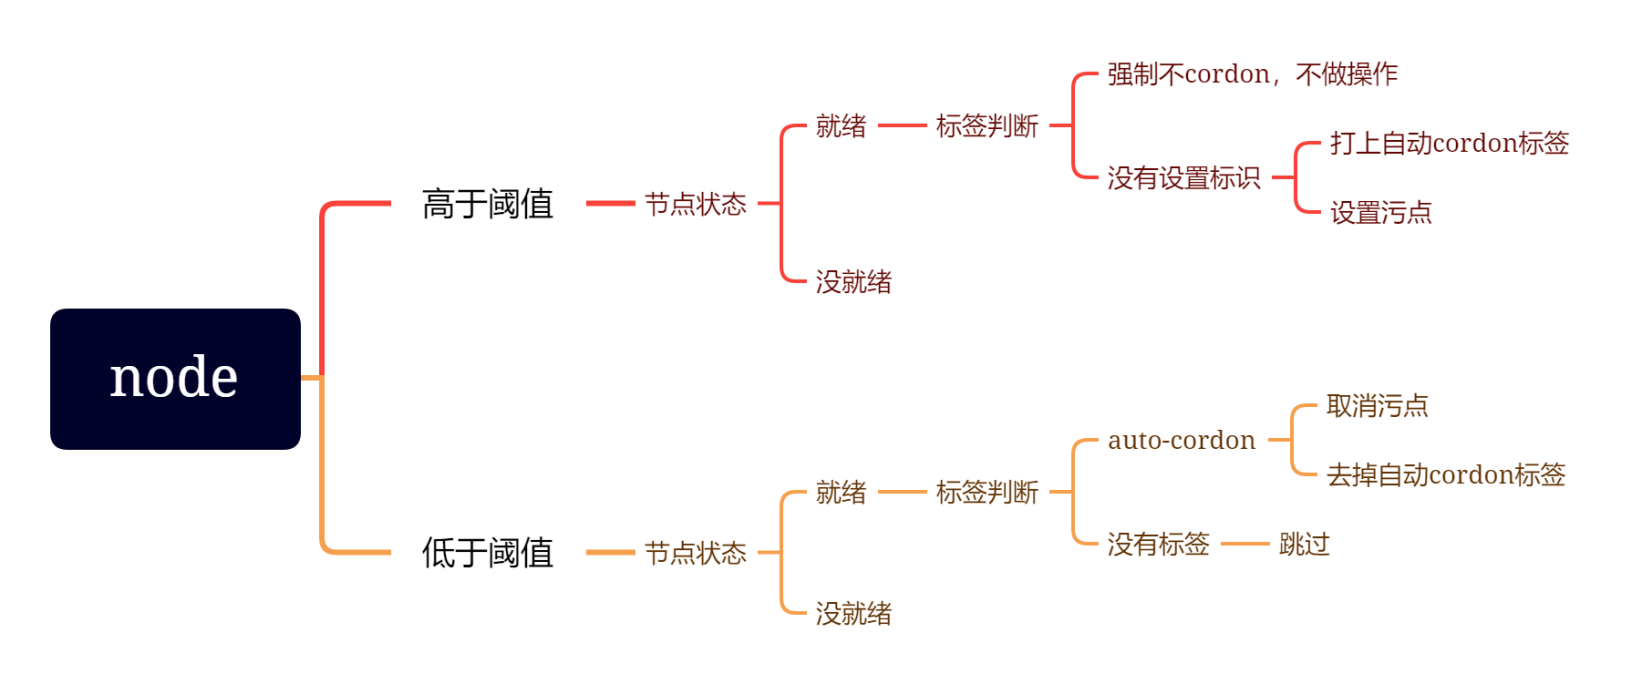
func AutoCordon(clientset *kubernetes.Clientset) {
	var (
		pods int
		err error
		max = cf.Conf.CordonConfig.Max
		min = cf.Conf.CordonConfig.Min
	)

	log.Println("任务开始,请留意相关日志输出.")
	// 获取所有节点信息
	list, _ := clientset.CoreV1().Nodes().List(context.TODO(), metav1.ListOptions{})
	for _, item := range list.Items {
		// 获取节点就绪状态
		conditions := item.Status.Conditions
		status := utils.PharseNodeStatus(conditions)
		
		// 获取pod数量
		pods, err = CountPods(item.Name, clientset)
		if err != nil {
			panic(err)
		}
		// 获取节点cordon状态
		unschedulable := item.Spec.Unschedulable

		// 获取节点标签
		labels := item.Labels	
		auto_cordon, donot_cordon := utils.PharseLables(labels)

		// 条件判断,是否cordon
		if status && pods > max && !donot_cordon && !unschedulable {
			// cordon 节点
			type patchStringValue struct {
				Op    string `json:"op"`
				Path  string `json:"path"`
				Value bool   `json:"value"`
			}
			payload := []patchStringValue{{
				Op:    "replace",
				Path:  "/spec/unschedulable",
				Value: true,
			}}
			payloadBytes, _ := json.Marshal(payload)

			_, err := clientset.CoreV1().Nodes().Patch(context.TODO(), item.Name, types.JSONPatchType, payloadBytes, metav1.PatchOptions{})
			log.Printf("节点:%s, pod 数量超过阈值%v, 当前:%v, 自动cordon. \n", item.Name, max, pods)	
			if err != nil {
				panic(err)
			}
			// 打上自动cordon过的标签
			labels["auto_cordon"] = "yes"
			lablesData := map[string]interface{} {
				"metadata": map[string]map[string]string{
					"labels": labels,
				},
			}
			lablesBytes, _ := json.Marshal(lablesData)
			_, err = clientset.CoreV1().Nodes().Patch(context.Background(), item.Name, types.StrategicMergePatchType, lablesBytes, metav1.PatchOptions{})
			if err != nil {
				panic(err)
			}
			log.Printf("节点:%s, 打上自动cordon过的标签. \n", item.Name)	
		} else if status && pods < min && auto_cordon && unschedulable {
			// uncordon 节点
			type patchStringValue struct {
				Op    string `json:"op"`
				Path  string `json:"path"`
				Value bool   `json:"value"`
			}
			payload := []patchStringValue{{
				Op:    "replace",
				Path:  "/spec/unschedulable",
				Value: false,
			}}
			payloadBytes, _ := json.Marshal(payload)
			_, err := clientset.CoreV1().Nodes().Patch(context.Background(), item.Name, types.JSONPatchType, payloadBytes,metav1.PatchOptions{})
			log.Printf("节点:%s, pod 数量低于阈值%v, 当前:%v, 解除cordon. \n", item.Name, min, pods)	
			if err != nil {
				panic(err)
			}
			// 删除自动cordon过的标签
			lablesData := map[string]interface{} {
				"metadata": map[string]map[string]interface{}{
					"labels": {
						"auto_cordon": nil,
					},
				},
			}
			lablesBytes, _ := json.Marshal(lablesData)
			_, err = clientset.CoreV1().Nodes().Patch(context.Background(), item.Name, types.StrategicMergePatchType, lablesBytes, metav1.PatchOptions{})
			if err != nil {
				panic(err)
			}
			log.Printf("节点:%s, 删除自动cordon过的标签. \n", item.Name)	
		}
		log.Printf("节点:%s, pod 当前数量:%v. \n", item.Name, pods)	
	}
	log.Println("任务结束.")
}

func CountPods(nodeName string, clientset *kubernetes.Clientset) (int, error) {
	var count int
	oo, err := clientset.CoreV1().Pods("").List(context.TODO(), metav1.ListOptions{})
	if err != nil {
		return 0, err
	}

	for _, o := range oo.Items {
		if o.Spec.NodeName == nodeName {
			count ++
		}
	}

	return count, nil
}

5. main 函数启动

写好逻辑代码后,我们在 main 入口函数出引入,具体步骤如下:

  1. 先初始化配置文件

  2. 再执行 AutoCordon 程序

 1
 2
 3
 4
 5
 6
 7
 8
 9
10
11
12
13
14
15
16
17
18
package main

import (
	cs "auto-cordon/pkg/clientset"
	cf "auto-cordon/conf"
	"auto-cordon/service"
)

func main() {
	// 初始化配置文件
	cf.InitConfig()

	cs.InitKubeConfig()
	clientset := cs.GetClientSet()
	
	// 执行程序
	service.AutoCordon(clientset)
}

代码编译

假设你本地已经装好了golang ,然后设置为 go module 模式

1. 环境配置

如果你是 windows 系统,需要交叉编译得先设置 go env -w GOOS=linux

1
2
3
4
5
6
7
go env -w CGO_ENABLED=0
go env -w GO111MODULE=on
go env -w GOARCH=amd64
go env -w GOOS=linux
go mod init auto-cordon
go mod tidy
go build -o auto_cordon --tags netgo -ldflags="-w -s"
注意
编译完后打成 Docker 镜像,推送到你的镜像仓,以供后面步骤使用(cicd 自行设计)。

2. 配置文件格式

根据 node 节点 pod 数量自动对节点设置污点,使其不再调度 pod 进入,pod 数量 maxmin 可以在 config.yml 里面设置,当 pod 大于 max 时,打污点,小于 min 时解除污点,例如:

1
2
3
config:
  max: 29
  min: 26

部署到集群

在具有 kubernetes config 配置文件的机器上部署,默认读取当前用户 .kube/config 文件,如文件不在该路径,可以通过 --kubeconfig filepath 指定,如不想这么调度,可以创建具有权限的 sa 账号给程序使用

新建 yaml 文件 auto-cordon.ymlcronjob 时间和 pod 数量自行根据场景修改:

 1
 2
 3
 4
 5
 6
 7
 8
 9
10
11
12
13
14
15
16
17
18
19
20
21
22
23
24
25
26
27
28
29
30
31
32
33
34
35
36
37
38
39
40
41
42
43
44
45
46
47
48
49
50
51
52
53
54
55
56
57
58
59
60
61
62
63
64
65
66
67
68
69
70
71
72
73
74
apiVersion: batch/v1beta1
kind: CronJob
metadata:
  name: auto-cordon
  namespace: kube-system
spec:
  concurrencyPolicy: Allow
  failedJobsHistoryLimit: 1
  jobTemplate:
    metadata:
      creationTimestamp: null
      labels:
        app: auto-cordon
    spec:
      template:
        metadata:
          creationTimestamp: null
          labels:
            app: auto-cordon
        spec:
          containers:
          - command:
            - /opt/auto_cordon
            image: your-docker-image-repositry/auto_cordon:v1.0
            workingDir: /opt
            imagePullPolicy: Always
            name: auto-cordon
            resources:
              requests:
                cpu: 1
                memory: 500Mi                 
              limits:
                cpu: 1
                memory: 500Mi
            terminationMessagePath: /dev/termination-log
            terminationMessagePolicy: File
            volumeMounts:
            - mountPath: /root/.kube
              name: kubeconfig
              readOnly: true
            - mountPath: /etc/localtime
              name: time-name
            - mountPath: /opt/config.yml
              name: config
              subPath: config.yml
          dnsPolicy: ClusterFirst
          nodeSelector:
            node-role.kubernetes.io/master: ""
          tolerations:
          - key: "node-role.kubernetes.io/master"
            operator: "Exists"
            effect: "NoSchedule"
          restartPolicy: OnFailure
          schedulerName: default-scheduler
          securityContext: {}
          terminationGracePeriodSeconds: 30
          volumes:
          - hostPath:
              path: /root/.kube
              type: DirectoryOrCreate
            name: kubeconfig
          - hostPath:
              path: /usr/share/zoneinfo/Asia/Shanghai
              type: ""
            name: time-name
          - name: config
            configMap:
              name: auto-cordon-cm
              items:
              - key: config.yml
                path: config.yml
  schedule: "*/5 * * * *"
  successfulJobsHistoryLimit: 3
  suspend: false

配置 configmap:

 1
 2
 3
 4
 5
 6
 7
 8
 9
10
apiVersion: v1
data:
  config.yml: |
    config:
      max: 100
      min: 90    
kind: ConfigMap
metadata:
  name: auto-cordon-cm
  namespace: kube-system

最后执行:kubectl apply -f 配置文件 应用到集群。

注意

注意:需要使用 inCluster 模式的,需要创建 ServiceAccount,并绑定 ClusterRole,以下例子为方便演示使用,用的 admin 权限,请自行修改

 1
 2
 3
 4
 5
 6
 7
 8
 9
10
11
12
13
14
15
16
17
18
19
20
21
22
apiVersion: v1
kind: ServiceAccount
metadata:
  labels:
    k8s-app: auto-cordon
  name: auto-cordon
  namespace: kube-system
---
apiVersion: rbac.authorization.k8s.io/v1
kind: ClusterRoleBinding
metadata:
  name: auto-cordon
  labels:
    k8s-app: auto-cordon
roleRef:
  apiGroup: rbac.authorization.k8s.io
  kind: ClusterRole
  name: cluster-admin
subjects:
- kind: ServiceAccount
  name: auto-cordon
  namespace: kube-system

至此,clientset 实战到此分享结束,有兴趣的朋友可以自行尝试。